
Mk.IV
WWI Heavy Battle Tank Mk.IV Male/Female 2 in 1
Takom – No. 2076 – 1/35
Although I’m deeply interested in German WWII tanks and armoured vehicles, recently I bought this Takom WWI Mk.IV kit to try something new, something outside my comfort zone and to widen my knowledge and this I’m happy about now because not only was this a pleasant build – it had such fascinating history behind it too!
It all started with Number 1 Lincoln Machine, in July 1915 by the Landships Committee to meet Great Britain’s requirement in World War I for an armoured combat vehicle able to cross a 8-foot (2.4 m) trench, after a number of failed attempts. This was eventually to become “Little Willie” – this first tank ever to be deployed in war! Under secrecy it was developed, tested and shipped to the front and one morning it took the Germans by surprise as it suddenly crossed the trenches! It must’ve been a strange sight for sure…

By Andrew Skudder – Flickr, CC BY-SA 2.0, https://commons.wikimedia.org/w/index.php?curid=3250684
After Little Willie the first “Mark” tanks was designed – Mk.I. It had a rhomboid shape and could drive over almost every trench the Germans had dug and it was at the time impenetrable by the enemy. Due to improvements as the war continued Mk.IV was later developed, and also an extension called “Tadpole” existed for the Mk.IV to extend the trench-crossing capabilities but structurally this didn’t work as planned and it was never used in combat as far as I know. The Mk.V and later the Mk.VIII (and Mk.VIII* (star)) were developed until they developed Mk.A “Whippet”.
The Germans didn’t even have their own name for tanks when these were introduced so even the Germans used the word “tank” before they begun calling them “panzer”. The Germans loved the Mk.IV so much they attempted to grab everyone they could, do a few minor modifications, give them a new paint job and then re-deploy them as their own tanks!
This kit from Takom comes with sprues for both Male and Female version, that is sponsons with cannons or double machine guns. I chose the Male version because bigger guns are always better… 😉
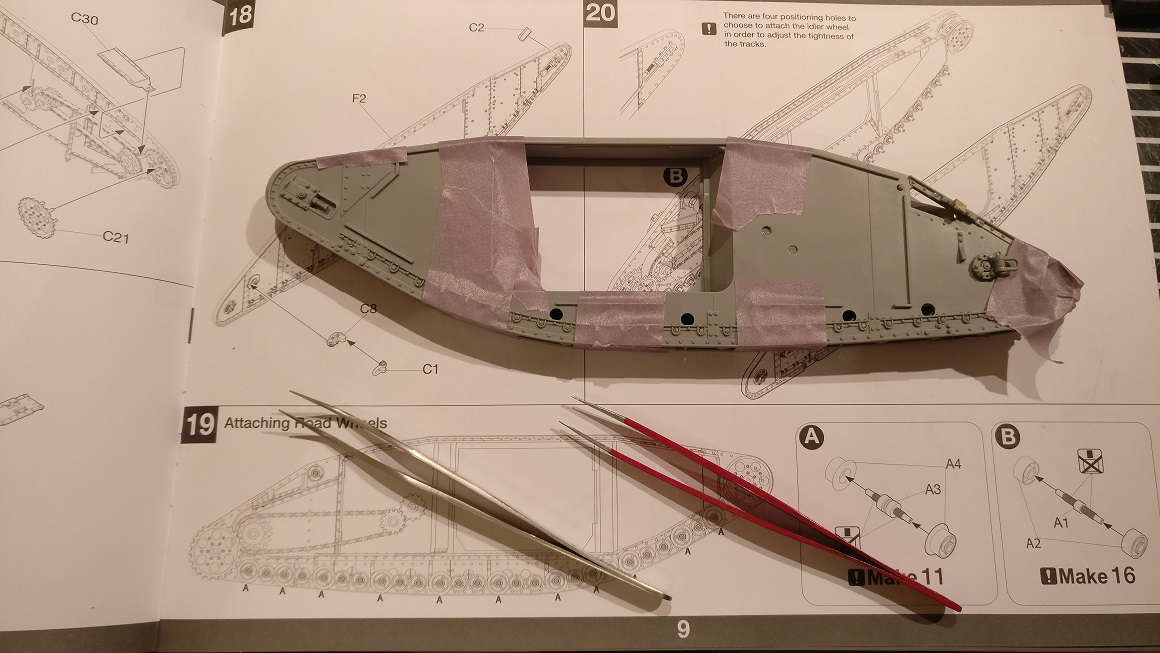
If you have never built a WWI tank before and only done WWII or later you’re in for a history lesson in early armour manufacturing, i.e. bolted steel plates. You don’t get a bathtub style lower hull in this kit, no, you have to assemble separate plates into the main hull that the two rhomboid track sides later attach to. Make sure you attach each plate to the next correctly, otherwise you’ll end up with fit problems down the line, especially when you build the sponsons! Be careful, take it slow and dry fit by using masking tape to hold the pieces together. Also be careful where you put your fingers because you are gluing large plates to each other and it’s easy to leave a finger print in the cemented pieces… I did on one place and it took a fair bit of work to fix. Completely my fault so be careful.
The only really tricky part of the build was the road wheels assembly. You have really many road wheels that you have placed, not glued, on one of the rhomboid halves and then you’re going to fit the other half whilst lining up all the road wheels and other parts making up the module, and this is very tricky! I first tried having all the parts where they should be but it was pretty much impossible because one or more of the road wheels always refused to line up, and as you tried to adjust them another couple went out of position – or even fell out a couple of times… Eventually I removed all but five road wheels, lined them up and put the halves together and used masking tape on one of the ends to keep everything together. After this I was able to insert one road wheel pair at the time until they all were in place and I could glue everything together! The first side took over an hour to assemble, the other 15 minutes because I now knew the trick! Take it slow here and resist gluing the road wheels to make it easier because if you do you no longer have working tracks. I try to have working tracks on all my models. This Mk.IV comes with really good working tracks too that require no glue to assemble so be extra careful to maintain your working tracks!
After the sides are on it’s time to build the sponsons and this is where you have to choose Male or Female. They are quite similar in assembly but they have their own parts so you’re going to have a lot of parts over when this kit is built – which is nice for the collections of spare parts that you later use for scratch building or modifications!
The kit also comes with an unditching beam/log and rails and a handful of PE parts. The unditching beam/log is attached with chains (one brass chain is supplied in the kit which you have to take pieces from) and this is a precision job for sure – and you’ll wish you had an extra hand or two… But the end results is great so take your time and you’ll be able to cut and splice the chain as instructed.
The sprue quality is really good and there was very little flash or ejector pin marks to clean up. Only one part was wrong – D14 (see photo in album) – but that was easy to fix with some putty. I didn’t have any fit problems with the armour plates that makes up all the exterior, but if you have any minor gaps this would only look realistic I think because I’m sure minor gaps would develop after it’d been in service for a while so don’t worry too much about that. Use putty if you need/want. I didn’t need this but I spent a lot of time looking at reference photos whilst building my Mk.IV and I think this is a very realistic kit!
There are no tools or external utilities to add, only the unditching log. I’m also adding a fascine to my model (a hazel bundle they used to kick down into deep trenches to make it easier to drive across) but that’s a scratch built one and doesn’t come in the kit. I just moved the unditching log to the rear position and it worked fine.
It comes with 4 options for paint jobs and decals, 2 British and 2 German captured tanks and the call out pictures are made by Mig Jimenez and they are very inspiring – and based on the real tanks they depict. I wish they could’ve included a bit more “generic” decals but I was able to cut up my decals to create my own tank.
The instructions were clear and simple to follow. Takom have improved their instructions the last year or so I think. The last ones were easier to follow than the one I’ve got for my King Tiger with full interior… I hope Takom (and the others) begin to release all their instructions as pdf in the future to make it easier to zoom in to tricky parts.
So what did I think of the Mk.IV kit from Takom then? Well, since building this I’ve now ordered a Whippet as well, and I’m going to build the Mk.I, Mk.IV Tadpole and the Mk.V too in the near future because this was great fun and something different compared to the WWII tanks I normally build! A lot of fun and a very detailed and realistic kit! I’m also going to build the FT-17 soon since I’ve got in on order already and at some point I should get the Char too…
I would’ve liked some interior in this kit, to add to the realism and to show us what it might’ve been operating such a beast amidst all the noise and fumes from the engine… It doesn’t have to be a “full interior” like they’ve done with the King Tiger, or they will do (I assume?) with the soon to come Panther, but drivers seat and controls and the engine perhaps? I might attempt to scratch build this on one of the other WWI tanks I’m going to build.
It doesn’t quite reach the 5 out of 5 mark, but it’s a very strong 4 – and I yet again have to thank you people at Takom for producing such high quality kits, and at very reasonable prices too! Working tracks in the box is such a treat and I just hate “magic tracks” or other tracks that you have to glue link by link, into a rigid glued track that can never move… This is why I so often put Friulmodel tracks on my tanks, just to make them working and realistic.
If you, like me, mainly build WWII tanks and the odd aircraft and such but are curious on WWI and the tanks that started everything then this is the kit for you! You can choose Male of Female and it comes with working tracks and builds really well! There’s also so much great history behind the “Mark” programme that it’ll keep you busy for days just reading!
Here are some pictures from my build of the Takom Mk.IV. It’s work in progress since it’s not yet finished, but almost… (I will add the final pictures to the slideshow when done.)


So thank you yet again Takom for a great kit! A worthy 4 out of 5. Building WWI tanks are as fun and challenging as the WWII ones, and I can see a small diorama coming up with this one perhaps… 😉


January 17, 2021
Ser fantastiskt bra ut!
January 17, 2021
Tack! 😀